Monday, March 23, 2009

Beezo Brau


In the past week, Mike and I have been brewing and bottling Beezo Brau. A (hopefully) delicious blend of malt extract, hops, water, and yeast. Mike found the recipe at Brew Your Own magazine online. It seemed simple enough so we went out two Saturdays ago, got lit up at the BLB for breakfast and went to the home brew store in St. Louis Park. We were poking around to collect the items on our list (which happened to be several photographs of my whiteboard).

Neither of us had any idea how the whole thing was set up so I couldn't visualize what it was going to look like. We were poking around, dodging the salesman who kept trying to be helpful, but we were too committed to the lie that we knew anything about beer brewing. We were looking at glass carboys when a sales woman came up and said she could have it sent up to the front if we wanted it. We looked at each other, then back at her, and said, "we'll take it." At that point we were committed, and started snapping up everything on our list. We got out of there and back to Mike's before we realized we didn't have a stopper or a racking cane. I returned to the store only to find it closed at half hour earlier (3:00). By a happy dumb luck I had picked an Ale Pail as our bucket, whose lid had a stoppered hole in it.

So we heated the water, added the malt extract, and stirred it up good in the steel kettle on high heat. Once it hit a boil, we dumped the Golding hops, stirred and enjoyed the delicious, earthy aromas. After a turn, we blasted the wort with finishing hops, and jammed the bastard into an ice bath in Mike's sink. That worked like shit, so we put the whole kettle in the freezer.

We needed to cool down to around 70F before aerating it, pitching the yeast, and capping it in the ail pail with an airlock. So we hung out and sterilized all of the gear we were going to use. Built a couple of beer funnels, called Bingers, to remind us of day gone by. Did up the beer and done.

Skip ahead a week.

First of all, the Friday before hand, we got caught up with the good doctor V in a whirlwind of happy hours, then to my place to try out the Binger, then to Mike's to get his Binger, then back to the Good Doctor's, where we proceeded to relive the frat life we'd never lived. SigTranDelt is by far the worst fraternity on the face of the planet, but the people are cool. So you can imagine how we felt on Saturday...

Barely able to move, difficulty with daylight, waves of nausea - thankfully the BLB cured al that with delicious breakfast, and we were back to the beer store for an auto-siphon rather than racking cane, stopper, and more ingredients.

The sterilization proved to be a huge bitch this time because everything that the beer comes in contact with has to be soaked in bleach solution and that meant 48 bottles, buckets, little hoses, etc. Pain in the ass. But we got it done. The siphoning turned out to be a little tricky, but it was mainly just slow. We got 41 bottles. And have to wait till a week Wednesday to try them...

After that, we moved the whole operation to my place, and brewed up another batch - this time with different ingredients - same recipe. It's sitting in my kitchen, now, gurgling...

Wednesday, March 18, 2009

On Vacation

On vacation with Sarah - In Lutsen.  Will write more once back.

Friday, March 13, 2009

The Survival Kit - II

So I talked a bit about my theory on survivaling involving expected duration which influences your location relative to civilization or help which, in turn, dictates the amount and types of gear you'll bring. So if you were planning on going out for a few hours and you end up with a foot crushed under a boulder, somebody's going to come looking for you sooner (don't tell me you didn't tell someone where you were going, where you were ending, how long it was going to take and the names and numbers of local rescue operations to call in the event that you don't check in at the pre-determined time).

So what happens when you want to go out for a day or more? You're going to want the same list of stuff from the last post and more of them, plus some additional items. You're also going to have to think about how far you are traveling from civilization (will you be within walking distance of a Sonic?). If you're not going too far from the chance of meeting other people, then you still may not need and hunting tools, but you should think about having everything for the duration of your excursion plus the off chance of breaking both legs, being mauled by a bear, and losing either your pants or bag in the river all happening.

First things first, you're going to need more. More Band-Aids, SteriStrips, gauze, painkillers, water tablets, tinder, lighters, matches. You're also going to need more options, make sure you have a backups and make sure they are in different places - the pockets of your shell, on your person, and in your bag. I carry and extra StrikeForce fire starter, signaling mirror, para-cord, and handkerchief in my bag, it might be overkill, but these items weigh next to nothing and only one of them may end up working or remain in your possession. I have a prescription bottle filled with extra matches, fire wicks, and steel wool.

In addition to these items I add:
A 5" fixed blade survival knife (false edge, semi-serated, solid butt end, compass?)
A multi-tool
Antibiotic ointment
Anti-histamine spray
10 potent painkillers
1 Five-day regimen of oral antibiotics
Glove liners - if it's cold
Flares

I'm also assuming you've got extra socks, a change of base layer, a hat, sunscreen, etc. commensurate with the conditions. And if going out for more than a day, you've got a sleeping setup, rain fly, stove, food, etc. But the above things should be considered above-and-beyond-this-level survival gear.

So let's imagine that you're out for the day and you don't check in, well chances are good that you won't be out for more than another 24 hours in which case you'll want those energy bars to last, get more water and purify it, tend your wounds, light a fire, etc. All of which you can do thanks to your survival preparedness. But let's say you're hiking and you get turned around - you can't remember your orienteering class that well and the map you've got is too small a scale. You're out of food. If only you'd brought some small things with which to make ends meet! Well here're a couple of extra things you might want to bring.

100 yd. 10 lb. test mono-filament fishing line
50 assorted hooks
50 Assorted sinkers
Foam ear plugs
100 yd. soft brass wire
Slingshot
.22 rifle with scope
100 rounds .22 ammo
50 rounds .22 high velocity ammo

The first four on the list are used to fish, you can set several small pole traps along the edge of a river and use the earplugs as bait if you can't find anything else. The fishing line can also be used with the wire to set snares and traps for small game. The rest are conventional weaponry. If you're going far away from civilization then a rifle may be appropriate, in which case you'll want (maybe more ammo, depending) a .22 with a scope, you'll be able to shoot squirrels and other small game. With the high velocity rounds you could take down some larger game, but it would have to be close and a head shot. The slingshot is the best idea, I think. You can carry it easily, arm it with any kind of projectile, it's lawful (and accepted) in more places and situations than a rifle - I used to have one as a kid and it was great. I'm think I'l pick one up. You could use it to stun or kill small game. If you stun it be prepared to give it a solid whack with a heavy stick. Actually, probably best to do that, or break its neck, regardless (you don't want rabies and other terrible diseases to compound your misfortune, do you?).

Of course, all of this is useless if you don't know the best ways to put it to use, so read up. You'll find that survival kits don't vary a ton and the concept behind every item fits a purpose that other items in other kits fulfill. But know how to build a shelter, a trap, a snare, a fishing setup,a splint, and administer you med kit right. Know what's edible and what you can cook from scratch. Most of these idea are found in this excellent book, New and Revised Practical Outdoor Survival by Len McDougall.

Saturday, March 7, 2009

The Survival Kit


In the past year or so I've gotten into the idea of survivaling (note: I don't think this is an actual word but I'm going to use it anyway). This is not a new area of interest for me as it touches on self-reliance, planning, and the outdoors. If I'm going to be a solo camper, go on an extended paddle, or spent some years on a sailboat, I'm going to need to know some practical survival techniques. When the towers went down and again bird-flu hit I also developed a ditch bag in case of Armageddon. A ditch bag is a sailing term for a pre-packed bag of essential gear that you can abandon ship with, survive, and be located at sea in your life raft. So far I've been active in assembling the basic, north woods survival kit for camping and paddling. The thing is, when you're planning on being lost, you want to have everything you can possibly think of, which obviously isn't the case in a survival situation, so there are many systems and practices to get in the habit of when going out on regular excursions. I've determined that there are three gradients of variables to consider when going out into nature. They are expected duration, climate, and gear storage. Expected duration of your outing will determine what you bring with you, period. We're helped in the knowledge that if we aren't going very far, if we're in trouble, we're probably closer to help than if we'd gone out farther and longer. Seems like a no-brainer, right. We can bring fewer med supplies, could skip food-gathering tools, and extra fire-making equipment. However, if we go out, even if only planning for a few hours, you should have the basics, which I'll list out below:

3" folding blade
Handkerchief
Space blanket
Poncho or shell
Whistle
Mirror
Compass
Map
Fire starter
Lighter
Tinder
15ft or more 300-500lb. test para-cord
Band-Aids
SteriStrips
Gauze
Ace Bandage
Painkillers
Water tablets
Leather Glove Shells

For me, a lot of these items are combined. My handkerchief would always be around my neck, head, or folded in a pocket, and I have a gizmo that is a whistle, flint, dry storage for matches and tinder (approx. 20 matches, marble sized mound of steel wool, and 5-8 fire wicks), it has a compass on top and the whole thing is on a lanyard that goes around my neck. I'm not too fond of the compass or the flint, so I have a Sparkie fire starter tied to the lanyard as well, and I would throw a compass in with the rest of the kit. I'd also always have my knife on me at all times day or night in my pocket. The rest can be carried in a small bag that probably has some energy bars and a bottle of water. The space blanket and poncho take up nearly no room - if it's colder or gets colder or windy at night, you're going to want the shell. I wouldn't actually bring the mirror, because I have a small one in the whistle and the space blanket is reflective.
The point is to have all of this stuff that wouldn't be in your pockets in a container that's pre-packed in your bag, then you only have to throw your water and snacks in there. But it's also about the storage of those items. What if your bag gets snagged or falls off a cliff, or you fall into a river and loose your pants, but your bag is dry on shore. See the idea? It's just like your asset portfolio, you want that shit diversified across all of your pockets. Like I said with the shell if it's windy, the climate or suspected climate should effect your survival gear. It might include liners for your leather gloves, another micro-fleece layer, another pair of socks. You get the idea.
Next time I'll talk about the day-long kit you should have at which point, you'll want to think about having to get food if you're stuck. You'll want to stock up on additional tools and weapons to ensure you have options.

Wednesday, March 4, 2009

Murmeltier - I - The Frame


Murmeltier is a flat-bottomed sloop Marconi-rigged with a mainsail and Genoa flying off a bowsprit on which I've attached a siren from an overflowing volcano of booze served at Chino Latino - let's call her Adrienne.


As I mentioned in an earlier post, Murmeltier was born out of sickness - a local flu virus and a greater emotional akin to seasonal affective disorder. I'm not exactly sure where the idea came from but I think it had something to to with public television's daytime programming.

As I started going back to work, I grabbed some stir sticks from Starbucks (unofficial sponsor) and some Elmer's glue from the office supply store. I glued a layer of sticks together side by side and coated it everywhere with glue, which has a nice glossy clear coat look when it's dry.

It was about this time that I realized I could actually do this. It was also about this time I started taking a bunch of shit for using water-soluble glue. Admittedly it would be fun to watch it disintegrate coasting along on Lake Calhoun, but I didn't want it to fall apart right away. I vindicated myself by demonstrating that the Elmer's wasn't a terrible idea because the sides of the boat needed to be shaped. I wasn't about to try and shape each one the same and then glue them together. So instead I glued them into a straight panel, let it dry, then wet it, and bent the whole panel at once using binder clips and nylon twine to hold them in shape. It worked like a charm.

Now I needed a bottom, deck, mast, bowsprit, and boom. I took one layer of sticks and layered another set of sticks on top staggered between the sticks of the first layer like common brick layering. Once I had a few panels like this I cut out the flat bottom using scissors, shaped the pieces with sandpaper and a knife and glued the initial structure together.

I was so pleased with myself that I forgot to worry about how the thin would maintain a course without a keel or rudder...

Tuesday, March 3, 2009

Beezo's Whiteboard - II

It's done! I got some better (and right-sized) drill bits and new anchors. Did some aggressive drilling (a little too hasty - got one hook crooked), bashed those anchors in, and screwed in the brackets good. And it didn't matter that one of them was crooked - worked like a charm. With a little help from Sarah, we decorated it for the initial photo.

This one is better than the last one I had - made by the Board Dudes - why that didn't throw me off in the first place, I don't know. But it sucked. After a few months it wouldn't erase at all. Piece of shit. This one cost a lot more, but hopefully it'll last longer. Anyway, now that I've got my whiteboard, on to bigger and better things...

Monday, March 2, 2009

UberBoat

For Christmas my mom have me a sailboat to build out of a new kind of building block, UberStix. They are made to be very versatile and interconnect with all kinds of recycled items like straws, bottles, rubber bands, etc. While I find the concept impressive and laudable, I think I would have been really disappointed trying to build this as a child. Expectations play cruel trucks on children and I think getting a toy that comes in a box with a sailboat on the cover sends the message that the child will be able to build the boat given the right attitude, patience, parts, and instructions. Well the UberStix fail in the instructions department because they don't flow tightly and linearly. These ones tell you to tie a bunch of pieces together with the one piece of string provided before telling you to measure and cut thee pieces of string from the one piece and create three of the objects depicted in the previous panel. See, you're already confused and you're not even trying to build the damn thing. Enough about that. So if you're a parent and you buy a toy for the kid make sure you're willing to build it yourself because that's what's likely to happen. So these toys aren't so much like an 'assembly required' piece of furniture from Ikea which generally has all of the parts and instructions to make one thing that is not meant to be disassembled and are more like a free for all with suggested building ideas. So I wouldn't recommend it for the person more interested in the end and not the means.

So I put this thing together in a few hours on Christmas day before getting fed up with the directions (which is the truth - one of my pet peeves is terrible directions). I just got back to it yesterday and it took me about and hour to get the stays working properly and finish it up according to the directions and now I'm ready to test it.

The thing I'm worried about with this design is how the sail attaches to the mast and boom. I supplemented a few paper clips instead of just thread but I think it's created too much space and therefore the sail shape will be off and not conform to the shape of the mast and boom. I guess we'll see when the ice thaws.

Beezo's Whiteboard


So setting up my new whiteboard was supposed to be an easy operation. Do a little measuring, drill a couple holes, and affix the hardware. Done, right? Wrong.


First of all I didn't have the right size drill bit for the size of the anchors - didn't think that'd be a big deal, just go in there and ream it to size. Well that probably would have worked fine had my walls been constructed this side of the last century. As is I think the brick exterior is a lot closer to the interior of my wall than I thought. So let's just say I was a little surprised when my drill bit hit brick (I'm going with brick over, say, plumbing, skeleton, or treasure). Trying to ream the holes out didn't do any good either - made some nasty sounds and wear to the drill bit. In any event, too many thunda we're going wrong for this simple operation that I decided to give up for the time being. Tonight I'll go get some more anchors and the right size drill bit and are what happens.

Friday, February 27, 2009

Sloop v. Sloop

I began building Murmeltier long before I planned on starting this blog. In February of 2008 I got really sick and was on the couch for week - terrible flu symptoms. It then that I decided I wasn't going to live in the cold for very much longer. I've had a love-hate relationship with MN for a long time and never intended on being back here for as long as I have. The only reason I did was to try and start over on the cheap. I wanted to be around family and friends and save money while I made a decent run at getting some stories published from the spare room in my parents' house. It didn't work out and along the way shifted from writing to business through my day job. So there I was, sick, 3 years later, living in an apartment in uptown, working on becoming a project manager, and I thought: "what the hell is going on here? I was only planning on being here for a short time. My mother has moved away and my dad is gone. I'm not saving any money and I'm still living in MN." I decided that I needed to escape from winter and the Midwest, but furthermore I needed to roam, be alone and self-reliant, and be somewhere warm - what better way to do that than from a sailboat? I've been dreaming (and preparing) ever since about the day I get to kick-off from the US and just putz around. Realizing that that day may be farther off in the future than I would like it to be, I set about building my own sailboat - the Murmeltier (marmot) - out of wooden stir sticks. The following posts will detail how that project has gone so far and will build up to the finishing touches I'll make to it in the coming month in preparation for launch this spring and a final race against the Uberstix sailboat I got for Christmas.

Thursday, February 26, 2009

The Penny Stove - II

So I've discovered the secrets of the penny stove and there were several things I don't know about prior to my test on Tuesday.

First of all, I should have know the mechanics of the stove prior to lighting. That should go without saying for all projects but often can take some of the fun out of it. Anyway, the stove works using the can to direct the flow of heat and pressure of the fuel and its vapors. To that end, the penny acts as a valve. When it is sitting at normal state the penny creates enough tension so that the fuel doesn't drain into the cup allowing you to light it. Once lit, the flame heats up the aluminum burner, fuel cup, and liquid fuel. Due to the differences between the aluminum and copper (or zinc, I should say), the heated aluminum creates a space between the penny and the burner allowing the now-heated fuel to slip down into the cup. The fuel boils in the cup, vaporizes, and presses out the path of least resistance which is through the keys on the outer ring of the burner. As the vapor sprays out of the keys it comes in contact with the lit priming fuel and combusts.Knowing that, I now know what was going wrong beyond having the wrong materials. First was that I was filling up the fuel cup with and also the center of the burner, but what I should have been doing was leaving the penny in place to keep the fuel out of the cup and filling up the center to the point were the fuel spills over the lip and covers the jet holes. This does two things - heats the fuel cup better and retains some lit fuel on the edges of the stove to ignite the jets as they start spraying gas.

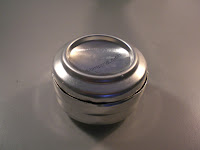
Having found out how the stove works and how to light it, I made sure to get some denatured alcohol (because pure grain alcohol is illegal in this state - figures) and I also wanted to find something out of which to build my pot stand. I found exactly what I'd been looking for at my trusty ACE hardware. Denatured alcohol is basically pure alcohol with additives that render it undrinkable but it's used as a solvent. I also found some metal skewers with rings at the end. I cut them into a tripod like the directions indicated. But before I did that I tried to make a cool cylindrical lattice of wire from the end of a cheap whisk. It didn't work out very well because I didn't bend them all the same way which made it difficult to line up in the end. It also was not sturdy enough to hold my pot so I smashed it with a hammer and tried again with much improved results. Take a look. All I really need now is a wind shield and I'm good to go. Can't wait to try this out for on the trail.

Tuesday, February 24, 2009

The Penny Stove


Here's something I stumbled upon, it's called a Penny Stove and it's made from beer cans. Who could pick a better project? So I decided to make one this evening. It requires three Heineken keg cans, three irrigation stakes, some Everclear, and a penny.

I didn't know this at the time - I knew I needed beer and irrigation stakes, but I couldn't find the stakes on my route home from work. The beer was easy to grab. Drinking it was easy and cutting up the cans was pretty awkward. I thought I'd use just the pocket knife because if I needed to build one in a pinch... In the end it turned out to be easier to cut a good line on the can with the knife. the scissors kind of got in the way. Drilling the holes probably too a little longer but it was easy enough to do. I did end up using a scissors, a leatherman, and a sharpie.

I didn't know the type of alcohol, because I didn't dig deep enough so I just thought I'd use rubbing alcohol. I couldn't find the alcohol, so I used brandy. Judging from all of the torched houses I've seen in movies that the damn thing would explode so I wore my science goggles as a precautionary measure. Thankfully no one was there to take my picture. Well, brandy isn't as explosively flammable as advertised. So I looked harder and found the rubbing alcohol. I tried using it with limited success. I did get it to light on fire, put it didn't sustain the flame.

Upon reading deeper, it seems that I wasn't priming it, filling it, or lighting it properly. There's a shocker. Also, I guess rubbing alcohol can cause a steam bubble to form and blow the penny right off. So I'm holding off for now until I know more about how this thing is supposed to work and it'll give me a chance to get some of the right kind of alcohol - I do have camping fuel but I think that might be too high octane for the beer-can penny-stove.